This How to install android x86 on pc, laptop or notebook with a dual boot with windows operating systems like windows xp, windows 7 or windows 8.
It is not difficult to do that and need to understand a little of what is called the android x86. Android x86 is an android operating system which is used for the OS installed on your computer, laptop or notebook or virtual box so that android can be used on PC.
And I recommend to install android to install it separately on different partitions with windows operating system partition, so if windows installed on the first partition in the partition or drive C then Android installed on the second partition or drive D. In this tutorial i use android x86 RC2 tx2500 ISO you can use any android x86 like android x86 4.2 jellybean, and the latest one android x86 4.3 jellybean.
Here to make a partition from Drive C in windows 7:
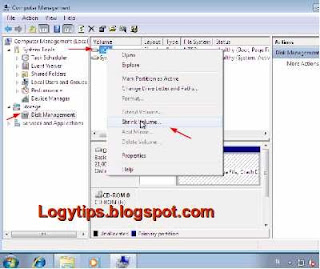
1. Open windows explorer2. Right-click Computer and select Manage posts that will be out a new window as shown below.
3. Click the Disk management of Storage. To get started create a partition from an existing partition as the partition is to be created from Drive C partition, right-click the mouse and select Shrink volume.
4. In the third option the input numbers or the size of the partition to be created as a new partition that will be created is the 2GB of the literature in 2048 and then click shrink.
5. Later will come the new partition unallocated, then right mouse click on the partition and select New Simple volume, click next, next and there will be income for the partition name and rename the desired fit and the next again until the finish button to completion.
Note: Actually, the first way is not recommended because if the windows when install grub android is not detected windows boot that have been installed on the computer there will be no choice or option entered in boot but still can boot to be returned to windows by manual settings on grub or use windows repair. Windows detected by grub can be seen at No. 9 on the first step.
Method 1. How to install android on pc or computer, a laptop dual boot with windows OS with grub on android:
1. Download android x86 here choose as you wish.2. Burn to CD burning software of your choice to use eg. nero, iso master etc.. Or burn through usb flash disk using unetbootin or isotousb.
3. Create an empty partition will be installed android on a new partition of at least 1GB/2gb. It is recommended to format partition to FAT32 or EXT3 so we can access android root, if you using EXT3 on windows EXT3 format will not be read so use the application Explore2fs or ext2fsd to open EXT3 partitions in windows.
4. Restart the computer and boot first to the CD or usb flash can be seen on the step 2 at No. 4.
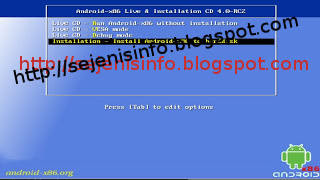
5. The first boot will look like this. To start the install select the last part it is installation.
This picture is from my second blog at http://sejenisinfo.blogspot.com on Indonesian language.
6. Select the partition you want to use, be careful don't wrong installation on partition because if wrong might actually be installed on the existing windows partition, lucky if at the time of install android on partition in is not format so the windows are still there. In the picture below installed on sda2 which means that in windows can be is Drive D:, to several partitions in windows sometimes different readings on the Linux partition with can sometimes be sda2 is Drive C or Drive E:.
7. On the next menu will be seen menu options to format or not like in the picture below, but the suggested format to fat32 or ext3 partition, so we can be able access android root.
8. Next will be asked to install grub, select yes to install grub on android x86. But there are differences in the method two could be seen under the second method. If windows booting not detected then booting into windows will disappear, when windows boots detected by android grub as seen at No. 9. Look on the method two using grub2win for different way to install grub.
9. Computers have been installed to the windows then the option of grub install windows will be detected as in the picture below and click yes.
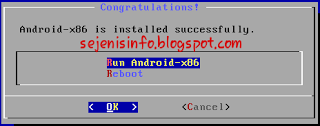
10. Android-x86 will soon begin to install and soon there will be another option to determine the capacity of the partition image for application, adjusted to the needs defaults to 512 MB and can be added to 2 gigabytes for example by typing 2048 click enter on keyboard then wait until the installation process is complete.
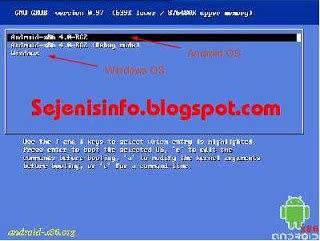
11. Option to dual boot android and windows grub from android-x86.
Method 2. Install android dual boot with windows OS Boot with grub2win:
1. Download live CD android x86 android according to the needs like froyo, 2.3 (Gingerbread), Android 4.0 ics (Ice cream sandwich), 4.2 (jellybean) here.
2. Burn Android x86 ISO to CD or USB flash drive, to burn it to cd can use nero or the other and to burn ISO to usb maker, unetbootin etc. ..
3. I'm here install android using usb flash disk, restart the computer and go into bios and select first boot to usb or by restarting the computer and click one of the following keys F7, F8, F9, F10, F11, or F12 according to the settings for the computer enter boot option to usb.
4. If you are booting to a live CD android x86 select the installation and follow the steps listed in android
5. For the partition choose is the newly created partition
6. Format to FAT32 or EXT3 for android can be access to root, if the partition with ntfs format then we cannot access android root .
7. Don't install grub skip for this choice Because the grub will be installed in the windows later. If you want install grub from android grub just choose yes and yes for windows detected there but if windows not detected by grub you can add manually later.
8. Then select yes to read write partition so that the partition will not be locked.
9. Select Yes to save the data.img on the hard drive, can be adjusted to a maximum size of 2GB.
10. Once completed reboot or restart the computer and log into Windows.
11. Download grub2 for windows here. Extract grub2 for windows on drive C. Go to the folder and install grub2 in the folder install once installed grub2 grub.cfg will be created in folder grub2 open grub.cfg with notepad and add the boot menu android.
I use android-x86-4.0-RC2-tx2500.iso so here the grub for android android-x86-4.0-RC2-tx2500.iso and installed on sda2 or Drive D on partition two. Here the example grub setting for android x86 iso tx2500 4.0-RC2 if you choose grub setting on windows later and place on the bottom of the note.
### Android ###
menuentry "Android-x86 4.0-RC2" {
set root='(hd0,2)'
linux /android-4.0-RC2/kernel quiet root=/dev/ram0 androidboot.hardware=tx2500 acpi_sleep=s3_bios,s3_mode SRC=/android-4.0-RC2 vga=788
initrd /android-4.0-RC2/initrd.img
}
menuentry "Android-x86 4.0-RC2 (Debug mode)" {
set root='(hd0,2)'
linux /android-4.0-RC2/kernel root=/dev/ram0 androidboot.hardware=tx2500 acpi_sleep=s3_bios,s3_mode DEBUG=1 SRC=/android-4.0-RC2 vga=788
initrd /android-4.0-RC2/initrd.img
}
### END Android###
Every android x86 grub downloaded it will be different according to the android x86 ISO download
Note: The red texts replace with your android partition during installation, or as if android is installed in the partition third or Drive E :/ then replace (hd0, 2) with (hd0, 3), and if the partitions are only primary no logical drive so drive E as hd0,3 and if the partition or drive E is logical drive then Drive E is (hd0, 5) sorry if make wrong, replace the name eeepc with current android name that installed, can be viewed at the downloaded android ISO. And one more thing you could change the VGA = 788 (800x600) with a resolution corresponding to a computer or laptop in question, eg vga = 791 (1024x768) to view all modes VGA = ask, DPI = 16 can be replaced with DPI = 120 or DPI = 160 and there is a possibility without DPI can enter so if something happens ... do not have to use DPI = XX.
14. Save a notepad and restart the computer, if grub2 successfully installed then there are boot options menu when the computer is on, select boot to grub 2 boot menu and select android to choose the android OS.
15. Good luck.


No comments:
Post a Comment