Showing posts with label Computer Tricks. Show all posts

Monday, 9 February 2015

How To Transfer Data From Android To PC/Laptop Using WIFI

How To Transfer Data From Android To PC/Laptop Using WIFI
Many times we need to transfer data from our phone to PC/Laptop or vice verse because of to save our personal photos, audios, videos and other files in PC/Laptop or mobile phone. In every day we often connect our phone to computer with the help of USB. But you cannot carry or have USB all the time with you but any situation or time when you have to need to transfers data from computer/laptop to your phone  or vice verse in college or any other place then it becomes difficult for it.But don't worry there is always a solution of every problem so that for this problem a Software Data Cable app is designed for android users to transfers the data from mobile phone to computer or computer to mobile phone without any use of data cable. This app is free of cost and you can download it from Google play store. With the help of this app it becomes easy, fast and secure way to to transfers data.  This app can Connect and share everything among phones, Pad, Google TV, Cloud storage, Xbox, PC, Mac, Laptop etc. So here is a simple steps to download and transfers data from android phone to PC/Laptop or vice verse without using data cable.

Steps To Transfers Data From Android Phone To PC


#1. First of all you have to an same WiFi network connection on computer or your android phone.
#2. Then simply Download the Software Data Cable app from Google Play Store.


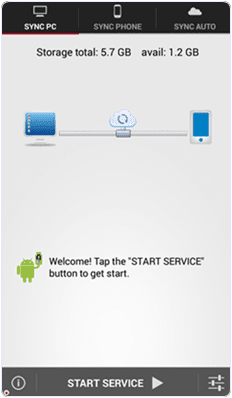
download-Pepsi-Skate-3D
download-Pepsi-Skate-3D-sync-data

#3. Install the app in your android phone and click on start service.

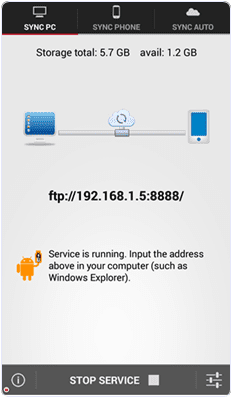
download-Pepsi-Skate-3D-ip-address

#4. Then it will show you ftp://192.168.1.5:8888 address, simply copy the address or fill into your computer address bar and click OK. It will show you storage folder where your all files stored now  you can transfers the data from your android phone to computer or vice verse.
ip-address-in-my-computer
I hope you like this method and find easy to use. In case you have any question please leave your comments below.


Thursday, 11 July 2013

Change Windows XP Service Pack 2 to Service Pack 3 Without Installation

Change Windows XP 

Service Pack 2 to Service Pack 3 without Installation


Hi to all. Here I am going to share a method to change windows xp service pack 2 to service pack 3 within just a minute.
We all must have come across a situation when we would be requiring Windows XP service Pack 3 to run some applications or due to some other reason but we may be running Service pack 2. I have also come across this situation and then I googled it and found a very simple solution to this problem. so Here I am sharing this trick with you all.

Change Windows XP Service Pack 2 to Service Pack 3

change windows xp service pack 2 to service pack 3
  1. First go to run by clicking on the start menu or simply pressing Windows + R button on Keyboard.
  2. Now type regedit in  the run box and hit enter.
  3. Make a backup of your registry (just in case)
  4. Browse to “HKEY_LOCAL_MACHINE\SYSTEM\ CurrentControlSet\ Control\ Windows”
  5. Modify the value of “CSDVersion” from “0×00000200″ (SP2) to theWindows XP SP3 value of “0×00000300″
  6. Now close the Registry editor window and Reboot/Restart yourcomputer.
  7. After restarting your PC Check Your PC properties , It will be showingWindows XP service Pack 3.
Now I will explain you what we did now…

When we changed the value of CSD Version from 200 to 300. It makes the OS think that it is Service Pack 3. And thus if you install any program requiringWindows XP service Pack 3 and up then that program will also think that it isWindows XP 3.  So now you know how to change Windows XP service pack 2 to service pack 3 So use this trick to fool Windows and enjoy....