Monday, 8 July 2013
How To Use Cookies Premium Account With Javascript + Video
This summary is not available. Please
click here to view the post.

Thursday, 4 July 2013
How to screen capture android with or without root on samsung galaxy
One of the things that is needed on android in android phone when there is a picture or something that is important and should be immortalized by capturing the image or commonly called is a screen capture on android.
And this is some screen capture application to perform in android phone and usually there are some paid applications and free applications are also required to capture android screen takes root and without root, here I will give you or recommend a screen capture application with android application and without application.
The easiest of course is with no apps and of course rooting access is not required. And unfortunately I can only capture android without root this way is only used for android samsung galaxy and others may be different ways to do it.
I previously did not know the way but with learning and googling I finally found this way very easily, to his knowledge that I take and I posted here I hope he's not upset that I forgot to blog that I read about how to capture screen in samsung android galaxy phone.
2. After your android phone on and navigate into the image or screen on the android phone to take pictures or to capture screenshot.
3. Image is ready to be shot, hold a button on the center and if the screen appear other option then press on the right button is back button once, to start capture click button on/of until the sound heard and images will be save in the screenshots folder on your sdcard.

4 To determine the results open the gallery and see the screenshots folder there are the results.
Android samsung gt S5360 we should be more careful or cautious to press the home button and the power button because if one of the screen capture does not work.
So for a little explanation is that first hit the home button which is located in the center bottom of the android phone and then press the power button simultaneously for a few seconds and press ahead approximately up to 2 or 3 seconds and release.
1. No Root Screenshot It, android screen capture application which is paid but its use does not need to root our android phone so it can be directly used.
2. Ultimate screenshots made by Ice Cold Apps. Screen capture apps for android that there are two options one could with root and does not require root.

3. Screenshot by Kastor Soft, we can save the results of capture to image JPG, BITMAP or PNG. And there are some other chosen to play like a photo automatically or shake your Android to capture images.

4. Screenshot Free By Wise Shark Software, now this one I have not tried, and in description this apps no rooting is required
And this is some screen capture application to perform in android phone and usually there are some paid applications and free applications are also required to capture android screen takes root and without root, here I will give you or recommend a screen capture application with android application and without application.
The easiest of course is with no apps and of course rooting access is not required. And unfortunately I can only capture android without root this way is only used for android samsung galaxy and others may be different ways to do it.
I previously did not know the way but with learning and googling I finally found this way very easily, to his knowledge that I take and I posted here I hope he's not upset that I forgot to blog that I read about how to capture screen in samsung android galaxy phone.
* How Screenshot without drawing android application and without root on samsung galaxy Y GT S5360.
1. Turn on your android phone :).2. After your android phone on and navigate into the image or screen on the android phone to take pictures or to capture screenshot.
3. Image is ready to be shot, hold a button on the center and if the screen appear other option then press on the right button is back button once, to start capture click button on/of until the sound heard and images will be save in the screenshots folder on your sdcard.

4 To determine the results open the gallery and see the screenshots folder there are the results.
Android samsung gt S5360 we should be more careful or cautious to press the home button and the power button because if one of the screen capture does not work.
So for a little explanation is that first hit the home button which is located in the center bottom of the android phone and then press the power button simultaneously for a few seconds and press ahead approximately up to 2 or 3 seconds and release.
* How to capture screen shot or image in android with apps:
There are some screen shots android apk apps free or paid which are in google play we can choose according to our choice and according to your needs and we download and install.1. No Root Screenshot It, android screen capture application which is paid but its use does not need to root our android phone so it can be directly used.
2. Ultimate screenshots made by Ice Cold Apps. Screen capture apps for android that there are two options one could with root and does not require root.
3. Screenshot by Kastor Soft, we can save the results of capture to image JPG, BITMAP or PNG. And there are some other chosen to play like a photo automatically or shake your Android to capture images.
4. Screenshot Free By Wise Shark Software, now this one I have not tried, and in description this apps no rooting is required
Change android font without root for flip font library samsung galaxy
Precisely few days ago I was coming of a friend who just bought an android phone samsung galaxy young s and he asked me to know how to change android phone font and his android phone from the use of another person and has done an update to android jellybean and the first issue He asked that the font is in the android there is only one option or its default font and the font look cool but almost unreadable because the font in its variations.
Font indeed many of kind and there are many forms and variations that exist but although the font nice and cool but if it is not readable and even confusing us so little hard to read and so confused to read it. And if you like with the fonts to make android look more cool.
One of them for font changer in android phone is Fontomizer SP and it is in dedicated font for galaxy but I do not know if this font can be used for other android phones but should be tried if you have a mobile phone than galaxy android and Motorola razor M and if the phone is there flip font library we can install it without root and can be use for samsung note samsung tablet.
1. Turn the phone and Internet is connected
2. If unknown sources is not in check in setting android phone then do with the click settings -> Security and check unknown sources.
3. Go to google play store and fill the text into play store search box with name Fontomizer or open the link here. Or if you want to install it one by one font can be downloaded font here save the font into android and install apk.
4. Android apps installed like any other we just simply click the install button and wait a few moments until the download and install automatically completed.
5. To change the font setting just click setting -> find the display.
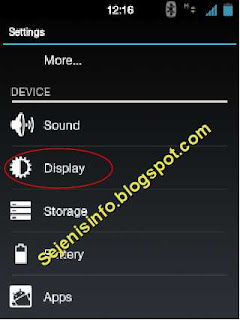 6. Click the Display Screen.
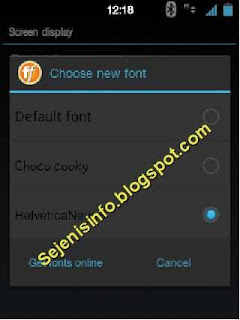
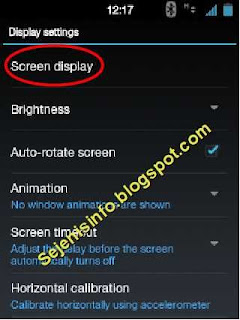 7. Click the Font Style and there will be the choice of font to be used, and restart android to display the results.
 8. Below is an example to select a font in samsung galaxy s android phone.
Be careful to change the font on your android, because sometimes if we are wrong or there is a font that is not in accordance with the android used the android will bootloop, don't know the cause for sure, but I've seen the bootloop android phone because he had to change fonts used in the android phone.
The second problem of the android phone my friend there is no local language and to adding that just use more locale 2 in google play store setting in custom settings with your current language, but not all languages can be translated into the current language.
 And the second is to install custom language is a set of local and language apps, it is also almost the same can not all be translated.
Sample images to change the language in android that I use is change from English to Indonesian.
Indeed, of which I have any experience with the application of the language in android but only partially changed but it can help.
Perhaps in addition to changing the languages there are many other android app we can try but this time I only providing an example app above.
Font indeed many of kind and there are many forms and variations that exist but although the font nice and cool but if it is not readable and even confusing us so little hard to read and so confused to read it. And if you like with the fonts to make android look more cool.
One of them for font changer in android phone is Fontomizer SP and it is in dedicated font for galaxy but I do not know if this font can be used for other android phones but should be tried if you have a mobile phone than galaxy android and Motorola razor M and if the phone is there flip font library we can install it without root and can be use for samsung note samsung tablet.
Here's how to install a new font for android that can be directly downloaded from the of google play store.
1. Turn the phone and Internet is connected
2. If unknown sources is not in check in setting android phone then do with the click settings -> Security and check unknown sources.
3. Go to google play store and fill the text into play store search box with name Fontomizer or open the link here. Or if you want to install it one by one font can be downloaded font here save the font into android and install apk.
4. Android apps installed like any other we just simply click the install button and wait a few moments until the download and install automatically completed.
5. To change the font setting just click setting -> find the display.


Be careful to change the font on your android, because sometimes if we are wrong or there is a font that is not in accordance with the android used the android will bootloop, don't know the cause for sure, but I've seen the bootloop android phone because he had to change fonts used in the android phone.
The second problem of the android phone my friend there is no local language and to adding that just use more locale 2 in google play store setting in custom settings with your current language, but not all languages can be translated into the current language.

Sample images to change the language in android that I use is change from English to Indonesian.
Indeed, of which I have any experience with the application of the language in android but only partially changed but it can help.
Perhaps in addition to changing the languages there are many other android app we can try but this time I only providing an example app above.
Wednesday, 3 July 2013
How to Dual boot Windows OS and android x86 on pc
This post may be a little too long but it doesn't matter even if it has been old tips.
This How to install android x86 on pc, laptop or notebook with a dual boot with windows operating systems like windows xp, windows 7 or windows 8.
It is not difficult to do that and need to understand a little of what is called the android x86. Android x86 is an android operating system which is used for the OS installed on your computer, laptop or notebook or virtual box so that android can be used on PC.
And I recommend to install android to install it separately on different partitions with windows operating system partition, so if windows installed on the first partition in the partition or drive C then Android installed on the second partition or drive D. In this tutorial i use android x86 RC2 tx2500 ISO you can use any android x86 like android x86 4.2 jellybean, and the latest one android x86 4.3 jellybean.
2. Right-click Computer and select Manage posts that will be out a new window as shown below.

3. Click the Disk management of Storage. To get started create a partition from an existing partition as the partition is to be created from Drive C partition, right-click the mouse and select Shrink volume.
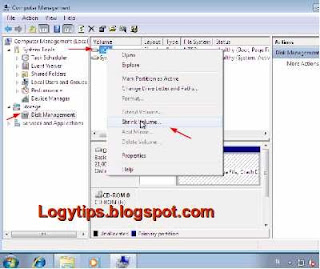 4. In the third option the input numbers or the size of the partition to be created as a new partition that will be created is the 2GB of the literature in 2048 and then click shrink.

5. Later will come the new partition unallocated, then right mouse click on the partition and select New Simple volume, click next, next and there will be income for the partition name and rename the desired fit and the next again until the finish button to completion.

2. Burn to CD burning software of your choice to use eg. nero, iso master etc.. Or burn through usb flash disk using unetbootin or isotousb.
3. Create an empty partition will be installed android on a new partition of at least 1GB/2gb. It is recommended to format partition to FAT32 or EXT3 so we can access android root, if you using EXT3 on windows EXT3 format will not be read so use the application Explore2fs or ext2fsd to open EXT3 partitions in windows.
4. Restart the computer and boot first to the CD or usb flash can be seen on the step 2 at No. 4.
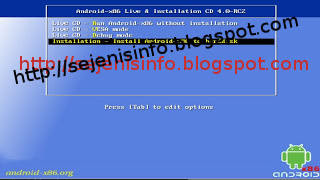
5. The first boot will look like this. To start the install select the last part it is installation.
This picture is from my second blog at http://sejenisinfo.blogspot.com on Indonesian language.
6. Select the partition you want to use, be careful don't wrong installation on partition because if wrong might actually be installed on the existing windows partition, lucky if at the time of install android on partition in is not format so the windows are still there. In the picture below installed on sda2 which means that in windows can be is Drive D:, to several partitions in windows sometimes different readings on the Linux partition with can sometimes be sda2 is Drive C or Drive E:.

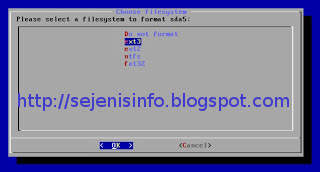
7. On the next menu will be seen menu options to format or not like in the picture below, but the suggested format to fat32 or ext3 partition, so we can be able access android root.
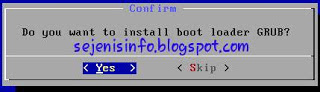
8. Next will be asked to install grub, select yes to install grub on android x86. But there are differences in the method two could be seen under the second method. If windows booting not detected then booting into windows will disappear, when windows boots detected by android grub as seen at No. 9. Look on the method two using grub2win for different way to install grub.
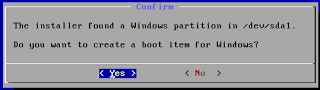
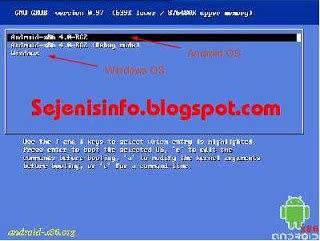
9. Computers have been installed to the windows then the option of grub install windows will be detected as in the picture below and click yes.
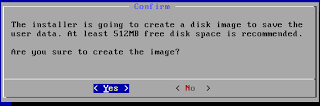
10. Android-x86 will soon begin to install and soon there will be another option to determine the capacity of the partition image for application, adjusted to the needs defaults to 512 MB and can be added to 2 gigabytes for example by typing 2048 click enter on keyboard then wait until the installation process is complete.

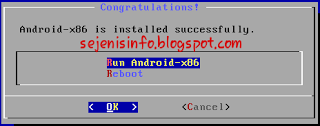
11. Option to dual boot android and windows grub from android-x86.
1. Download live CD android x86 android according to the needs like froyo, 2.3 (Gingerbread), Android 4.0 ics (Ice cream sandwich), 4.2 (jellybean) here.
2. Burn Android x86 ISO to CD or USB flash drive, to burn it to cd can use nero or the other and to burn ISO to usb maker, unetbootin etc. ..
3. I'm here install android using usb flash disk, restart the computer and go into bios and select first boot to usb or by restarting the computer and click one of the following keys F7, F8, F9, F10, F11, or F12 according to the settings for the computer enter boot option to usb.
4. If you are booting to a live CD android x86 select the installation and follow the steps listed in android

5. For the partition choose is the newly created partition

6. Format to FAT32 or EXT3 for android can be access to root, if the partition with ntfs format then we cannot access android root .

7. Don't install grub skip for this choice Because the grub will be installed in the windows later. If you want install grub from android grub just choose yes and yes for windows detected there but if windows not detected by grub you can add manually later.

8. Then select yes to read write partition so that the partition will not be locked.

9. Select Yes to save the data.img on the hard drive, can be adjusted to a maximum size of 2GB.
10. Once completed reboot or restart the computer and log into Windows.
11. Download grub2 for windows here. Extract grub2 for windows on drive C. Go to the folder and install grub2 in the folder install once installed grub2 grub.cfg will be created in folder grub2 open grub.cfg with notepad and add the boot menu android.
I use android-x86-4.0-RC2-tx2500.iso so here the grub for android android-x86-4.0-RC2-tx2500.iso and installed on sda2 or Drive D on partition two. Here the example grub setting for android x86 iso tx2500 4.0-RC2 if you choose grub setting on windows later and place on the bottom of the note.
Every android x86 grub downloaded it will be different according to the android x86 ISO download
14. Save a notepad and restart the computer, if grub2 successfully installed then there are boot options menu when the computer is on, select boot to grub 2 boot menu and select android to choose the android OS.
15. Good luck.
This How to install android x86 on pc, laptop or notebook with a dual boot with windows operating systems like windows xp, windows 7 or windows 8.
It is not difficult to do that and need to understand a little of what is called the android x86. Android x86 is an android operating system which is used for the OS installed on your computer, laptop or notebook or virtual box so that android can be used on PC.
And I recommend to install android to install it separately on different partitions with windows operating system partition, so if windows installed on the first partition in the partition or drive C then Android installed on the second partition or drive D. In this tutorial i use android x86 RC2 tx2500 ISO you can use any android x86 like android x86 4.2 jellybean, and the latest one android x86 4.3 jellybean.
Here to make a partition from Drive C in windows 7:
1. Open windows explorer2. Right-click Computer and select Manage posts that will be out a new window as shown below.

3. Click the Disk management of Storage. To get started create a partition from an existing partition as the partition is to be created from Drive C partition, right-click the mouse and select Shrink volume.


5. Later will come the new partition unallocated, then right mouse click on the partition and select New Simple volume, click next, next and there will be income for the partition name and rename the desired fit and the next again until the finish button to completion.

Note: Actually, the first way is not recommended because if the windows when install grub android is not detected windows boot that have been installed on the computer there will be no choice or option entered in boot but still can boot to be returned to windows by manual settings on grub or use windows repair. Windows detected by grub can be seen at No. 9 on the first step.
Method 1. How to install android on pc or computer, a laptop dual boot with windows OS with grub on android:
1. Download android x86 here choose as you wish.2. Burn to CD burning software of your choice to use eg. nero, iso master etc.. Or burn through usb flash disk using unetbootin or isotousb.
3. Create an empty partition will be installed android on a new partition of at least 1GB/2gb. It is recommended to format partition to FAT32 or EXT3 so we can access android root, if you using EXT3 on windows EXT3 format will not be read so use the application Explore2fs or ext2fsd to open EXT3 partitions in windows.
4. Restart the computer and boot first to the CD or usb flash can be seen on the step 2 at No. 4.
5. The first boot will look like this. To start the install select the last part it is installation.
This picture is from my second blog at http://sejenisinfo.blogspot.com on Indonesian language.

6. Select the partition you want to use, be careful don't wrong installation on partition because if wrong might actually be installed on the existing windows partition, lucky if at the time of install android on partition in is not format so the windows are still there. In the picture below installed on sda2 which means that in windows can be is Drive D:, to several partitions in windows sometimes different readings on the Linux partition with can sometimes be sda2 is Drive C or Drive E:.

7. On the next menu will be seen menu options to format or not like in the picture below, but the suggested format to fat32 or ext3 partition, so we can be able access android root.

8. Next will be asked to install grub, select yes to install grub on android x86. But there are differences in the method two could be seen under the second method. If windows booting not detected then booting into windows will disappear, when windows boots detected by android grub as seen at No. 9. Look on the method two using grub2win for different way to install grub.

9. Computers have been installed to the windows then the option of grub install windows will be detected as in the picture below and click yes.

10. Android-x86 will soon begin to install and soon there will be another option to determine the capacity of the partition image for application, adjusted to the needs defaults to 512 MB and can be added to 2 gigabytes for example by typing 2048 click enter on keyboard then wait until the installation process is complete.


11. Option to dual boot android and windows grub from android-x86.

Method 2. Install android dual boot with windows OS Boot with grub2win:
1. Download live CD android x86 android according to the needs like froyo, 2.3 (Gingerbread), Android 4.0 ics (Ice cream sandwich), 4.2 (jellybean) here.
2. Burn Android x86 ISO to CD or USB flash drive, to burn it to cd can use nero or the other and to burn ISO to usb maker, unetbootin etc. ..
3. I'm here install android using usb flash disk, restart the computer and go into bios and select first boot to usb or by restarting the computer and click one of the following keys F7, F8, F9, F10, F11, or F12 according to the settings for the computer enter boot option to usb.
4. If you are booting to a live CD android x86 select the installation and follow the steps listed in android
5. For the partition choose is the newly created partition
6. Format to FAT32 or EXT3 for android can be access to root, if the partition with ntfs format then we cannot access android root .
7. Don't install grub skip for this choice Because the grub will be installed in the windows later. If you want install grub from android grub just choose yes and yes for windows detected there but if windows not detected by grub you can add manually later.
8. Then select yes to read write partition so that the partition will not be locked.
9. Select Yes to save the data.img on the hard drive, can be adjusted to a maximum size of 2GB.
10. Once completed reboot or restart the computer and log into Windows.
11. Download grub2 for windows here. Extract grub2 for windows on drive C. Go to the folder and install grub2 in the folder install once installed grub2 grub.cfg will be created in folder grub2 open grub.cfg with notepad and add the boot menu android.
I use android-x86-4.0-RC2-tx2500.iso so here the grub for android android-x86-4.0-RC2-tx2500.iso and installed on sda2 or Drive D on partition two. Here the example grub setting for android x86 iso tx2500 4.0-RC2 if you choose grub setting on windows later and place on the bottom of the note.
### Android ###
menuentry "Android-x86 4.0-RC2" {
set root='(hd0,2)'
linux /android-4.0-RC2/kernel quiet root=/dev/ram0 androidboot.hardware=tx2500 acpi_sleep=s3_bios,s3_mode SRC=/android-4.0-RC2 vga=788
initrd /android-4.0-RC2/initrd.img
}
menuentry "Android-x86 4.0-RC2 (Debug mode)" {
set root='(hd0,2)'
linux /android-4.0-RC2/kernel root=/dev/ram0 androidboot.hardware=tx2500 acpi_sleep=s3_bios,s3_mode DEBUG=1 SRC=/android-4.0-RC2 vga=788
initrd /android-4.0-RC2/initrd.img
}
### END Android###
Every android x86 grub downloaded it will be different according to the android x86 ISO download
Note: The red texts replace with your android partition during installation, or as if android is installed in the partition third or Drive E :/ then replace (hd0, 2) with (hd0, 3), and if the partitions are only primary no logical drive so drive E as hd0,3 and if the partition or drive E is logical drive then Drive E is (hd0, 5) sorry if make wrong, replace the name eeepc with current android name that installed, can be viewed at the downloaded android ISO. And one more thing you could change the VGA = 788 (800x600) with a resolution corresponding to a computer or laptop in question, eg vga = 791 (1024x768) to view all modes VGA = ask, DPI = 16 can be replaced with DPI = 120 or DPI = 160 and there is a possibility without DPI can enter so if something happens ... do not have to use DPI = XX.
14. Save a notepad and restart the computer, if grub2 successfully installed then there are boot options menu when the computer is on, select boot to grub 2 boot menu and select android to choose the android OS.
15. Good luck.
Tuesday, 2 July 2013
Foxit Reader 6.0.5.0618 Final
 "Foxit Reader 6.0.5.0618 Final"
 Foxit Reader is the only eligible alternative reader/viewer for PDF files (eBooks). It's free, smaller, faster, and cleaner. And it starts up immediately, so you don't need to wait the annoying "Welcome" screen to disappear. Foxit PDF Reader is extremely easy to use, just double click it to start and then click open button to open your PDF document. If you want to print, click on "Print" button.
If you want to setup the page layout for printing, select "Print Setup" from "File" menu. Foxit Reader supports Windows 98/ Me/ 2000/ XP/ 2003/ Vista/ 7.
Unlike Adobe® Reader, this one has size about than 2.5 MB, needs no installation and opens up immediately. You don't need to go throught lengthy installation process to start using Foxit PDF Reader, just UNZIP the downloaded "pdfrd.zip" package into any place you want, then run PDFReader.exe. You can set Foxit PDF Reader as your default PDF reader, so you can double click on PDF files to open them within Foxit PDF Reader.
Now with Foxit Reader, you don't have to endure such pain any more.
The following is a list of compelling advantages of Foxit Reader:
• Breezing-fast: When you run Foxit Reader, it launches instantly without any delay. You are not forced to view an annoying splash window displaying company logo, author names, etc.
• Annotation tool: Have you ever wished to annotate (or comment on) a PDF document when you are reading it? Foxit Reader allows you to draw graphics, highlight text, type text and make notes on a PDF document and then print out or save the annotated document.
• Text converter: You may convert the whole PDF document into a simple text file.
• High security and privacy: Foxit Reader highly respects the security and privacy of users and will never connect to the Internet without users' permission. While other PDF readers often silently connect to the Internet in the background. Foxit PDF Reader does not contain any spyware.
Home Page -
http://www.foxitsoftware.com/

Specifications:
Developer: Foxit Software Company
Size / OS: 28.6 MB / Windows XP / Vista / 7/ 8 /
License: Free
Last Updated: 29/06/2013
Installation Guide:
1 - Install the software.
Download Links:
Programs: Direct Link | Portable
How To Download :
1. Click on the download links.
2. Wait for 5 seconds and then click on.

2. Wait for 5 seconds and then click on.

uTorrent Turbo Booster 4.0.2.0 (Full)
 |
| File--24.blogspot.com |
uTorrent Turbo Booster is a recent plug-in designed to improve the functionality of probably the most popular P2P file sharing application around – uTorrent. This tool comes equipped with modern technology that aims at getting your download speed way up so you can grab the files you want so badly much quicker than you’ve been used to. Movies, music, games, applications, you name it - uTorrent Turbo Booster will deliver at a fast pace. It will be there doing its job in the background without upsetting any other activity you might perform on your computer. . . .
Another benefit you’ll gain by using this high-end module is a higher number of download sources - more seeds will be available to you than normally discovered by your uTorrent.
A crucial element in choosing a proper accelerator such as this is reaching a full Internet connection tolerating at the same time minimal requirements – well, uTorrent Turbo Booster does them both. Your bandwidth will get its highest capability and you’ll get low CPU and a happy face.
Listed below are some of the uTorrent Turbo Booster’s main attributes:
• Pleasant and easy to operate interface;
• Automatically clears downloaded and incorrect files;
• Automatically resumes paused downloads;
• Operable by system tray icon for convenient and faster use;
• Automatically searches for multiple sources at user-specified intervals;
• Keeps configurations from last run and auto loads on start-up.
Home Page:
http://www.download-boosters.com

Download uTorrent Turbo Booster 4.0.2.0
Download Crack
How To Disable ADS In uTorrent
 |
| File--24.blogspot.com |
The most popular file sharing service “Torrent” has upgraded its client with new features and started showing ads. I know that everyone does not like ads being shown above there downloads. So here I’ll be sharing a method for disabling the ads in uTorrent. This method does not require any external software. Disabling of ads can be done by minor tweaks in the setting of the Utorrent client.....
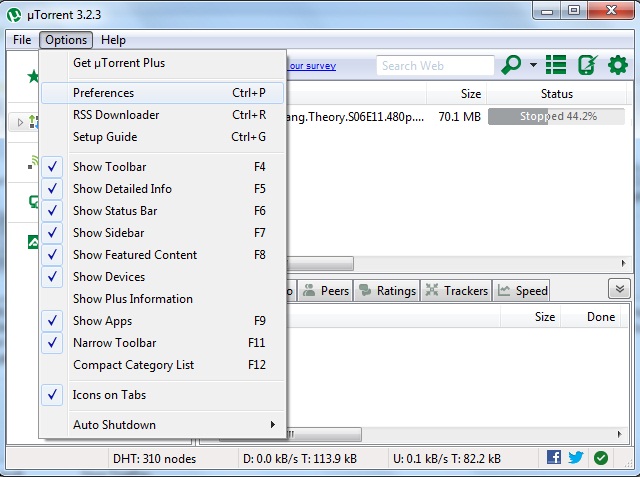
Its begins with opening your uTorrent client. Click on options and open preferences.
 |
| Click to enlarge picture |
Now got to advanced in the left panel of the uTorrent client.

In the search bar found in the right panel of the advanced tab, start typing the following text to access the settings for it.
left_rail_offer
left_rail_offer

Then double click on the text in the right panel to change the value to false. You could also set the radio button to false and click OK.
Repeat the above steps for following settings
gui.show_plus_upsell
sponsored_torrent_offer_enabled
bt.enable_pulse
gui.show_notorrents_node
offers.content_offer_autoexec
sponsored_torrent_offer_enabled
bt.enable_pulse
gui.show_notorrents_node
offers.content_offer_autoexec
Now restart you uTorrent client and you’ll see no ads
U can download last version u Torrent here:Click
U can download last version u Torrent here:Click

Subscribe to:
Posts (Atom)