Showing posts with label Linux Ubuntu. Show all posts

Friday, 7 March 2014

Install android kitkat x86 in virtualbox windows or linux ubuntu

After I made a post about how to install a dual boot android kitkat x86 and windows  if there is still the possibility of confusion between choosing a partition or grub settings to boot android entry or, for that I give one other alternative to install android x86 kitkat with virtualbox, I think install android PC / laptop with a virtual box more better because it's easier and does not create a new partition on the hard drive.

By install android kitkat x86 in virtualbox can be done in windows operating system like windows xp, windows 7 and windows 8 as well as linux ubuntu as long as the operating system already installed virtualbox.

The tips below I did install it on Linux ubuntu virtualbox for virtualbox in windows but also I think the same way as below.

And for those want to directly install a dual boot android x86 kitkat with windows or ubuntu can see here.

For using ubuntu after install android on it then can be added grub android setting open the terminal typing "sudo gedit /boot/grub/grub.cfg" without quotes and place it at the very bottom.

Android kitkat latest version of the android operating system with new features and we can use on virtualbox, with virtualbox the installation and use easier way, even if the internet will be directly connected to the internet if internet PC is connected, for that I suggest instead we install android on virtualbox is better  than dual boot, with virtualbox android kitkat then can we enlarge the view of the virtualbox, view by clicking the tabs at the top left virtulabox and click full screen.

Here's how to install android x86 kitkat in virtualbox windows or linux ubuntu :


1. Download virtualbox here or here, after the download and install on your PC / laptop.

2. Download Android 4.4 x86 kitkat here.

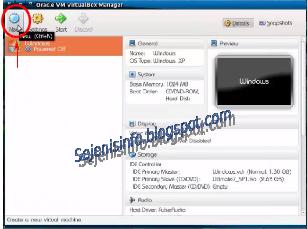
3. Open virtualbox and then click the New button on the left above under the menu file. All pictures in here is from my second blog.
android kitkat in virtualbox

4. Once clicked a new window will appear and click next, then fill the name in accordance with you want of its name is Android for example see the image below
setting android kitkat in virtualbox

5. Then click next after a new window will come out and determine the capacity for memory or RAM on your PC or laptop if it has 1GB ram I suggest to fill it with 128/256mb and if 2gb I suggest to fill it with 256/512mb.
ram virtualbox android kitkat 4.4

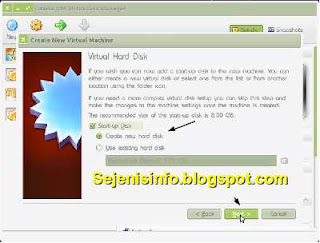
6. Next and new menu will appear to create a new virtual disk, select create new disk and click next.
  • make virtual harddrive virtualbox
  • Chooce VDI (Virtualbox Disk Image)
    virtualbox hardisk VDI

  • Chooce Dynamically allocated
  • Once finished creating the virtual disk and then click next and fill the hard drive capacity will be created, i suggest you to create 2GB.
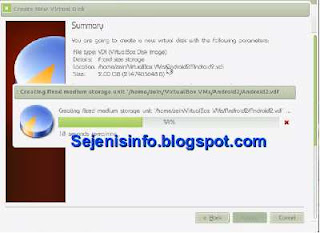
  • After the contents of the virtual disk fill with capacity then click the next button and then click the create button and the process bar will look like in the picture below if appear

7. See file machine android in the left as shown below.
8. To install android click settings button as shown in picture No. 7 and a new window will appear then select the storage, see the arrow and click a button to open a file choose disk where the android x86 ISO kitkat stored and select the file.
memilih file iso android kitkat di virtualbox

9. After the ide Controller filled with the android x86 kitkat iso file that was downloaded click the Ok button at the bottom, and click the start button.

The steps is still long so I recommend to look directly at the video below


Video above shows how to install android x86 in virtualbox kitkat so with the video would be easier we will do the installation. So every step will be obvious and may be less than the error read on :), as you may well know the use of language and grammar or spelling looks a mess.

Thursday, 10 October 2013

Install Android sdk emulator on linux ubuntu

How to install android sdk emulator on ubuntu linux as well as how to install android sdk on windows operating system , there may be a slight difference, both android sdk in ubuntu linux as well as windows.

Android SDK emulator as an alternate, the other is to install BlueStacks Android emulator than if if it turns out the specifications we have a computer or laptop vga less than 512 HD or not to install the BlueStacks will find some problems like error 25000 which means that the driver vga or vga / graphic should be updated to the latest version .

I think this emulator using android sdk android emulator better than others because every time I install the application then the application can run properly. But while the other is virtually impossible according to different opinions depending on what they see and used.

Android sdk is android that can be used on a PC or laptop and it is an interesting thing, so we do not need to buy Android phone if we already have another phone but as long as we have a laptop or PC then it can be done on a PC / laptop and it is an excess of PC / laptop, which almost could install all kinds of operating systems.

In addition we can use android on ubuntu together we can also install applications such as WeChat , whatsapp and computer line so we can run android applications .

How to install android SDK emulator on ubuntu :


1. Download and install opn jdk di ubuntu dengan cara.

Her way is to install open jdk available in ubuntu software center or synaptic package manager. open ubuntu software center and then on the right there is a small box and write open JDK, and you will see open jdk 7 and open jdk 6 or you can see here OpnJDK 7
install open jdk ubuntu
In the terminal :
sudo apt-get install openjdk-6-jre

2. Download android sdk for linux here.
3. After downloaded extract on everywhere you like for example on Documents folder
4. Open terminal on ubuntu CTRL + Alt + T and type command :
  • sudo gedit ~ /. Bashrc
  • copy and paste this text at the very top
    #AndroidDev PATH export PATH=${PATH}:/home/???/Documents/android-sdk-linux/tools export PATH=${PATH}:/home/???/Documents/android-sdk-linux/platform-tools
    save and close note :the red texts is the name android sdk folder that i store on my ubuntu, adjust to your android sdk folder that you store and saved.
  • And type command text below :
  • sudo gedit /etc/udev/rules.d/51-android.rules
copy and paste this text :

SUBSYSTEM=="usb", ATTRS{idVendor}=="0bb4", MODE="0666"
SUBSYSTEM=="usb", ATTRS{idVendor}=="0502", MODE="0666"
SUBSYSTEM=="usb", ATTRS{idVendor}=="12d1", MODE="0666"
SUBSYSTEM=="usb", ATTRS{idVendor}=="1004", MODE="0666"
SUBSYSTEM=="usb", ATTRS{idVendor}=="22b8", MODE="0666"
SUBSYSTEM=="usb", ATTRS{idVendor}=="04e8", MODE="0666"
SUBSYSTEM=="usb", ATTRS{idVendor}=="0fce", MODE="0666"
SUBSYSTEM=="usb", ATTRS{idVendor}=="0489", MODE="0666"
SUBSYSTEM=="usb", ATTRS{idVendor}=="18d1", SYMLINK+="android_adb", MODE="0666"
SUBSYSTEM=="usb", ATTRS{idVendor}=="04e8", MODE="0666", GROUP="plugdev"
Source that text is from  Ubntu community.
after the text above saved reboot or restart your laptop or computer

5. Open terminal CTRL + Alt + T and type "android"  without quotes to open android sdk emulator
android sdk on ubuntu

you can chooce android version that you will install
6. Click the install packages button on the right and accept license, wait after the downloaded done.
7. After all finish click tool tab is located at the top left.
8. A new windows will appear and click the manage avds button and click the new button to begin create android emulator on the right.
9. A new window will appear when the button is clicked and Insert your android name, select your choice according to size preference. If you want to change the size of the internal memory replace 200 to 512 and sd card to 1024 = 1GB and click OK.
10. Click start to open android will appear according to your choice.


To install Android sdk emulator on windows OS see here.

How to know ubuntu version and kernel installed command line

As has been mentioned on the official ubuntu website that in order to know the version of ubuntu Linux used in computer or laptop can be done in two ways, we can use detail in system setting or terminal by typing the command text and will be available there appearance ubuntu version installed.

Its essence if we are going to install an application on the terminal with don't know ubuntu version this Will be problem and then we searching an application in search engine like google, once we know if the application is there and it's just a coincidence version of the application can be used for example ubuntu 12, now from here maybe we start to think if we forget our Linux version because it can be different versions of ubuntu for example there will be different apps version on ubuntu 12.04 and ubuntu  12.10 .

So we pre- download apps that we use is useful to know the version of ubuntu Linux so that we use when install the application does not encounter an error or failure, because the version of the software that we use in different versions of ubuntu it normally would not be able to do will fail in the installation.

Linux operating system is an operating system that can be used for a variety of technology and so easy if we've learned a little about it. Even if we know that the linux operating system can change in a variety of other operating systems are different. Even android is basically an operating system derived from Linux. For that in contemporary times and we should be able to understand with Linux. In addition to the free license or a Open GPL can we update in accordance with what we want.

I hope in this tip can help to determine the version of ubuntu and the kernel. That way we can instantly locate the application or software in accordance with the ubuntu version used. Is it important? Yes of course be important because as I was said in the beginning that if we are going to install an application the application in question must be in accordance with the ubuntu version.

Here are two easy ways to determine the version of ubuntu and linux kernel we use is sourced from ( help.ubuntu.com ) :


1 . The first way is by clicking on the button settings can search in the upper right near the shutdown button or can we find on search applications by typing the word "System setting " without the quotes .

check ubuntu version installed

2. The second way is to use the terminal command line:

- Open a terminal that is in the application options by click CTRL + Alt + T on your keyboard
- Typing "sudo su" (without the quotes) and enter the password, it will run an application without sudo text while will open an application
- To find out what version of ubuntu in the terminal typing "lsb_release-a" (without the quotes) and "enter" the keyboard it will exit the output of ubuntu version used as in the picture below.
ubuntu installed version on terminal

3. How to know the version of the kernel used in Ubuntu is by typing "uname-r" or "uname-a" in terminal ubuntu.
ubuntu kernel version

If there are mistakes please forgive and hopefully useful and increase knowledge for me and also for the reader.

Monday, 7 October 2013

How to install linux ubuntu 12.04 lts with the pictures

How to install ubuntu 12.04 lts precise and I think any kind of way to install ubuntu also almost the same as how to install ubuntu 8, ubuntu 9,ubuntu 10, ubuntu 11, ubuntu 13 and although there are slight differences that may be found .

Linux is a free open source software , which means it can be used and updated for free, a lot of the linux operating system that we can use like a fedora, red hat,puppy , and etc. But here I will just give you a little tutorial how to install linux ubuntu 12.04, ubuntu linux is an alternative operating system windows, because the windows are not free, for it as an alternative we can use ubuntu linux that can downloaded for free and use other software also almost free, in addition to using linux then we do not need to worry with the virus because no virus on linux, it's like ubuntu said on the official site.

How to install linux ubuntu 12.04 lts precise pangolin with images :

1. Make sure the disk partition that Ubuntu is available for approximately 6 GB for ubuntu itself is actually about 4.3 GB and for the swap partition is 1024 MB or 1GB .

2. Download ubuntu 12:04 LTS precise for free here or select the appropriate processor like intel or amd used here .

3. There are several options how to install ubuntu is as follows :

  • Install using CD/DVD, backup ubuntu iso file that was downloaded with the software your choice such as nero, MagicISO etc,
  • Install using a USB flash disk using Unetbootin. 
  • Install with no CD without flashdik just use the installer on the internal hard drive of direct ubuntu iso file, but there must be a grub boot on your booting computer.

- For windows users install grub2win first.
- Extract Grub2win in Drive C:, after grub2win extracted you will find the grub2win.exe, double click to install it and you will find grub.cfg
- Enter the following settings in grub.cfg at the bottom of the texts available in grub2 folder .


menuentry " Ubuntu 12:04 ISO " {
set isofile = " / home / / Downloads/ubuntu-12.04-desktop-i386.iso "
# Or set isofile = " / / Downloads/ubuntu-12.04-desktop-i386.iso "
# If you use a single partition for your $ HOME
loopback loop ( hd0 , 5 ) $ isofile
linux ( loop ) / casper / vmlinuz boot = casper noprompt iso-scan/filename = $ isofile noeject
initrd ( loop ) / casper / initrd.lz
}


Or could look the source in help.ubuntu.com.

4 . Once determine that we are to install ubuntu boot to ubuntu installer and follow the steps, after first boot press space on keyboard to select the language.
install ubuntu 12-04 on computer or laptop

5. Select the "Install Ubuntu" text then select the language that will be used and wait until the loading display appears.
6. After loading passed then the next will be brought to the stage of selecting the language that will be used to install the ubuntu.
install ubuntu select language

7. Click the Continue button to proceed and will be brought to the stage for the beginning of the installation is selecting application / third-party software, click Continue to proceed.
continue installation ubuntu

8. After further we see there are two options, namely erase the disk and something else, select "something else" choice to start setting up the hard drive manually.

9. For the hard drive is still new we can make a new partition there by clicking the "New Partition Table" and the button "Add" to start creating new partitions and hard drives with setting self-determined choice but to install ubuntu partition to be available is 4.3 GB, and format with EXT4 partition type can be seen in the image below.
select harddisk setting install ubuntu

10. If you've made ​​a partition for ubuntu next we create one partition for swap partitions by clicking the "Add" button, swap partition is a virtual memory to make do with the RAM and hard drive capacity used on a laptop or computer so if:

  • RAM 512 MB and hard drive capacity is 30GB, then the swap partition is 512MB
  • RAM 512 MB and hard drive 100GB then the swap partition is 1024MB = 1GB
  • RAM 2 GB and hard drive 30GB then the swap partition is 1024MB or 1GB
  • RAM 2 GB and hard drive 100GB then swap partition is 2048MB or 2GB. And can be seen the sources in help.ubuntu.com.

make swap partition on ubuntu

11. The next setting place the boot loader that will and we can set example grub2 will be installed directly on the hard disk/dev/sda or on the first partition is /dev/sda1.
set bootloader grub2 ubuntu installation

12. Click the "Install Now" and wait a while till the process is completed and the next step is setting the location where we are.
ubuntu installation location choice

13. After clicking the continue button then the next step is the selection of the type of keyboard that will be used, select a standard keyboard commonly used is the "English U.S." and click Continue.
ubuntu standar keyboard

14. And I think this is the last part of which was to determine the username and password that will be used later during the entry, and I suggest to choose automatic login.
username password instalation ubuntu

15. After all we fill the username and password and click continue then wait for it to finish and if the installation is finished then restart button will appear and restart the computer, for using the cd/dvd after restart button wait a few minutes and click enter to open the cd/dvd rom opens by itself.
installation linux ubuntu

If you have questions and errors in this post please write a comment below this post.
Good luck

Friday, 6 September 2013

Android x86 jelly bean 4.3 install in virtual box on windows os

For those who always want the latest update ie android x86 here the android 4.3 jellybean x86  has been released and can be used after the previous android 4.2.2 x86 jellybean have to posted a few months ago and although android 4.4 kitkat released but android x86 no news yet about it.

With ​​there are some changes that have been updated and most of this time has been updated too with the support arm translator, which means we can run almost all android apps in google play store,  different with android previous ones is android x86 jellybean 4.2 that not support.

Before we try to install directly to the hard drive perhaps we could try to install android x86 in virtualbox so that we will know what the pros and cons of this android jellybean 4.3 x86. And if it is as expected and works well as the android phones are used. That way we can evaluate for themselves of the advantages and disadvantages of android x86 that we will install, because maybe there will be people who want to dual boot between android and windows that are installed together on PC/Laptop.

And here are some things that have been updated and corrected from the Android x86 source:


- Support ARM translator
- Support bluetooth
- Upgrade 3.10.2 kernel so that it becomes more driver support
- Upgrade Mesa OpenGL ES library to 9.2 devel for support amd radeon acceleration  and intel chipset.
- Also Not able to suspend and resume
- No support superuser.

There are several ways to install android version of this computer or android x86  jellybean 4.3, and I give it two ways.

1. How to install x86 android 4.3 jelly bean on a PC, or laptop computer can see linked below

dual boot android and windows.
The first way above could be see on steps in the link above and the grub setting install grub2win for android-x86 you can see the method in link dual boot android and windows above and add android x86 jellybean 4.3 grub manually below:

# android #
menuentry "Android-4.3-test"{
set root='(hd0,X)'
linux /android-4.3-test/kernel quiet root=/dev/ram0 androidboot.hardware=android_x86 video=-16 SRC=/android-4.3-test
initrd /android-4.3-test/initrd.img
}
### End Android ###

note: change the red text with  partition installed on android from your computer example if android on partition or drive D: then replace with (hd0,2) sometimes Drive D: = (hd0,3).

2. The second way to install android-x86 is in a virtual box

Also this steps can be use on Linux ubuntu virtualbox.
  • Download virtualbox windows version if it will install a virtual box in windows here because there are several other options such as Linux and MAC OS X.
  • Download jellybean X86 Android 4.3 iso android-x86-4.3-20130725.iso code@google or Android X86 .org 
  • After downloading the next step is to install virtual box on computer and start preparations to install android in virtual box.
  • Virtualbox installation on ubuntu linux or in windows like windows xp, windows 7 and windows 8 are method.
  • Open Virtual box  already installed on your PC or laptop and then click the new button to create a new virtual Android x86.
  •  
This images from my second blog.
android -x86 4.3 jellybean virtualbox

  • Then a new window will be seen and click next, fill the name in accordance with your current in the box provided, switch to the Linux operating system and switch to linux 2.6 version can be seen for example in the image below and click next.
android-x86 setting on virtualbox

  • The new window will be see to set memory capacity that will be used in a virtual box for android x86, if your computer has 1GB of RAM or memory then use the virtual box in 256mb or 512mb.
setting memory ram on virtualbox

  • Click next for another setting for the virtual hard disk, Create new hard disk and select the VDI and then select Fixed size and click next.
create new hardisk on virtualbox
vdi virtualbox
fixed harddrive virtualbox

  • Click next to set capacity to use, I use only 2GB.
hardisk partition for android x86 on virtualbox

  • Click next and click create and wait until bar process is to create a virtual hard disk finish as in the example picture below.
creating harddrive virtualbox
android x86 on virtualbox ready to install

  • Next click on the settings button to the storage arrangements to enter iso file into a virtual box that you created.

Because the steps are still long and I was a bit sleepy to continue this post, more can be seen on the video below for how to install android 4.3 x86 jellybean on virtualbox.

Tuesday, 3 September 2013

Failed to start or load libgl.so in ubuntu android sdk emulator

When I install android sdk emulator on a computer with the operating system ubuntu 12.04 and run and when i run android sdk emulator i have error message are failed to open or load libgl.so and shared , first I had thought that this was one of the low of the specifications of the computer that I use , but after I did a search on google and finally I got a solution that actually provide a solution .

I got this info from the learned stuf with title blog in the post is fixing ubuntu error : Failed to load libgl.so , that's the title of the post , and I would also like to thank you for having the blog :) .

I'm forget how to solve failed to load libgl.so on android sdk emulator in ubuntu is just to install libgl1 mesa , as shown below :
Open a terminal and run or install the following :
sudo apt-get install libgl1-mesa-dev

After i try and run the android sdk emulator in ubuntu , failed to load libgl.so hope is gone and is ready for use as well as the android sdk emulator that I use my computer at home.

Here the early solution from teh other with add the following command on terminal ubuntu than that by linking from another file like this :
ln - s / usr/lib/libGL.so.1 ~ / android-sdk-linux_x86/tools/lib/libGL.so 
After I try into it in The first load load successful but after I restart the computer and then run back android sdk emulator still error message again appears failed to load libgl.so. And in the end I just give up and use with failed to load libgl.so and shared libgl.so on android emulator but seems to be a little slower and lag and I used to be uncomfortable .

Once again I said many thanks to Learned stuff  for giving the best solution for me :) . Why do I talk too much because i need writing around 300 words in the word count office :) . And finally had fewer than 300 words :) . Good luck

Saturday, 29 June 2013

How to install windows xp from usb flashdisk and other windows

When we have a netbook or notebook but cd/dvdrom is damaged already does not work and even netbooks do not provide a place for cd/dvdrom because the smaller size of the notebook and when we will reinstall windows xp or other windows its such as windows 7, windows vista, or windows 8 we will be a little confused if we do not know how to install windows without the cd/dvdrom. But with its many software or applications to make a boot able usb flash disk windows installer made​​, then to reinstall windows xp like windows xp sp2 or SP3 very easy even using usb flash disk upon installation the installation even be faster than reinstalling windows with cd/dvdRom.

Actually many a great applications or software windows live CD installer maker but here I will only review this software. The name is Winusb maker and almost all the windows can be boo table usb flash drive like windows xp, windows 7, windows 8. Note: Flash disk be formatted then the data are in the flash disk must be backup and capacity should have a minimum of space flash disk should have a capacity of 2GB for windows xp, for windows 7 have to 3gb and windows 8 as big as 5GB.
winusb maker windows xp usb flash drive
The Picture above is the latest version of WinUSB Maker version 2.0.

Here's how to make or install windows to usb flash disk:

1. Download WinUSB Maker its application here
2. Extract the downloaded file in the desired place
3. Plug usb flash drive into your pc or laptop
4. Open folder winusb maker and run WinSUB maker.exe, if the flash drive is read by WinUSB Maker will be available at the welcome tab, and select the usb flash disk to be installed the windows
5. There are several options such as creating a bootable disk with the grub grldr boot linux and msdos bootable.
6. I do not recommend using that pirated windows, use the original windows. To begin to install windows xp or other windows by clicking the ISO file just click "Setup to USB" and select "I want to work with an ISO image file" and click on its button below "select an ISO file or directory" windows xp iso to choose in the disk directory, for start copying click the "Make USB boot able".
7. For copying windows in folder or in cd/DVDROM can click on the button "I want to work with a directory" Then again click the "select an ISO file or directory" to find the folder or CD/DVD ROM windows live to be in to a boo table usb pen drive. To start copy files to usb flash disk click the "Make USB boo table" and wait for finish.
8. After a flash disk already contains a live boo table CD windows xp sp2, sp3 or windows 7 or windows 8 to install probably already know how to install it, for that was a newbie can do as follows below. I told again that I do not recommend using a pirated windows.

How to install windows xp sp2, sp3 via flash drive:
1. Flash disk is definitely its already filled windows live CD.
2. Plug the usb flash drive on a computer, laptop, notebook or netbook then change the settings in the bios on the boot disk is part of the first set to 1st boot to usb boot or by restarting the computer and press button specified boot option settings by a computer, such as in general the key to make the disk boot option F7, F8, F9, F10, F11, F12 select one of them according by your computer settings, so the boot option will appear when it appears click boot to usb.
3. After booting to flash the initial display will be as shown below and press enter to continue.
install windowx p to usb flash disk

4. Then the display will be seen below, click Enter to continue.

5. Next is up to you, that is probably already know to install windows, just follow the instructions given at the time of install windows xp in usb flash disk.
Besides WinUSB Maker there are some free software to install windows xp and other windows into usb flash disk that are:
1. WinToFlash, Can be used for bootable windows xp, windows 7, windows 8, 2008 and others.
2. WinSetupFromUSB, can boot to windows and Linux
3. Xboot Multiboot usb pendrive iso creator, for Linux and windows
4. Windows 7 USB / DVD download tool, which is an official tool from Microsoft, can be used for windows 7, Windows 8.

Sorry if here I give some examples of the software to install windows xp and other windows, not clear how to install windows xp that detail.

For those reasons, if there is a mistake in this article I apologize.
But I hope this paper could also be useful to those who want a little bit of my knowledge of the tools or software to install windows from usb flash drive.

Monday, 24 June 2013

How to instal windows 7 on virtualbox

To installing Windows 7 than installed on a computer or on a laptop we also can do installed windows 7 in virtualbox and netbook, how to install windows 7 on a netbook to do it we used with usb flash drive, the flash drive must be filled a live cd windows 7 before and this is things that should be done.

What is the Virtualbox ? Virtualbox is a kind class-platform virtual machine that point to install multiple operating systems on your computer or laptop simultaneously in the operating system is running, such as windows, linux, mac os x and solaris and install android x86. For example we will install linux ubuntu in windows operating system that we run in computer or laptop, also install windows on linux ubuntu, install mac os on windows and so continue to the contrary. And virtualbox is that I use virtualbox from oracle. Oracle VirtualBox is current at the time counted by the time of this writing in the post June 25, 2013 is version 4.2.12 and available for multiple operating systems such as Windows (32/64bit), Solaris, Mac OS X, Linux ubuntu, debian and so forth.

Here I will show a few tips on how to install windows 7 on virtualbox, i use ubuntu operating system to run it so install windows 7 on virtualbox ubuntu but its almost the same way or even if we install windows 7 in virtualbox windows operating system and other operating system.

How to install windows 7 on virtualbox following  steps:

1. Download virtualbox oracle corresponding to your operating system here.
2. Install virtualbox and do to the next step
3. Early preparation to install windows 7 easier and faster installation time use windows 7 iso, to convet or compress windows 7 from cd to iso can be done with UltraISO, isomaster, Nero or other iso tool  and software in accordance with fondness.
4. Open virtualbox and follow the instructions required. As shown on the picture click New and then there will be a new window click next.

installing windows 7 on virtualbox

5. A new window will appear and fill with desire as  name as windows 7 and click next.
setting virtualbox for windows 7

6. The next step is memory or RAM setting if your computer or laptop has only have  1GB of RAM then fill it with 512 or less and if RAM 2GB fill with 1024 can be entered and then click next to get to the next level. And this we can adjust the settings menu in VirtualBox.

ram for virtualbox setting

7. Select the create new hard disk to create a virtual hard disk and click next.
virtual hard drive setting

8. In this option select only virtual disk from the VDI virtualbox itself and then click next.
setting vdi or virtual harddrive

9. There are two options to create new virtualdisk,  we could have chosen a Dynamically allocated but let the performance better and faster we choose a fixed size option.
virtualbox setting install windows 7

10. The next will be taken to a new window to the determines the size of the virtual disk size that will be used, for the size of windows 7 install a minimum of 10GB, the size of windows 7 install is currently at around 6GB. After determining its size just click next and click create to start create a virtual hard drive to manufacture finished wait a moment and click create set the settings back to the completion of the new virtualbox.
set vdi for hard drive virtual

11. After setting the above is done, the next step is setting up a live cd boot windows 7 it ​​could be the dvd windows 7 or windows 7 is already on file with compress iso, click the Settings button in virtualbox as in the picture below.
choose disk virtual

12. After click on button choose disk before it will exit the new window that is where we have to open the windows 7 iso file stored on the hard drive, select it and click ok.

13. Windows 7 iso or windows 7 DVD already in place in secondarily click the start button to begin the installation of windows 7.


14. If you click start've done it will display a new window or out the window to start the installation of windows 7.
start installing windows 7

15. Immediate installation of windows 7 in virtualbox, select the language base on your language, and then click next.
install windows 7 on virtualbox will running

16. Check the box I accept the license terms and click next.

17. If the virtual disk has not been formatted then click Drive Options to format the new partition.

18. Click the New button and click Apply to start formatting the hard drive.

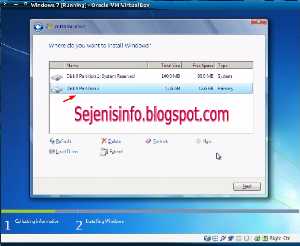
19. There will be two partitions is the first ,100MB partition is to boot windows and a second partition for Windows 7 installation, select the second partition or larger partition.

20. Wait until the copying process is completed. And after finish copying virtualbox will automatically restart and return to completing the installation process installation, and restarted again automatically and the final setup will appear.

21. Final stages of the installation process by providing your PC names, passwords and serial number or for activation windows 7 and the other can be done alone without I put his picture :).

22. Charging process and settings windows 7 complete it will display your windows 7 recently installed on virtualbox.


Actually the installation of windows 7, windows xp, windows 8 is almost the same steps performed in virtualbox for laptops, netbooks and computers, but for installing windows 8 on virtualbox may require specification of a computer or pc and choose a higher or virtualitation KVM sufficient to install windows 8 in virtualbox.

With the virtualbox then we can try any operating system without having to install directly into our hard drives. and we can test whether the operating system is good and fit with our desires.

Using virtualbox to be installed as a windows operating system such as Windows XP, Windows 7, Windows 8 and other windows.

Or we can install Linux such as ubuntu, redhat, android x86 and other Linux operating systems.
For MAC OS I have not tried but I think it could be installed in virtualbox.

Virtualbox can be used in reverse, for example, if your PC or laptop using the windows operating system virtualbox software available for Windows, and if we use the linux like ubuntu virtualbox is available for linux ubuntu and also for other linux.

Besides virtualbox which I have to say, there are some of the other virtual machines that can be used, and we install the operating system on it